Up to this point we have been concerned mainly with technical details, all of which are concealed from the user. We are overdue for a discussion of what the Spline Animator can do. In particular, we are interested in how the Spline Animator allows us to create and utilize a splined camera path.
The Spline Animator allows the user to realize a camera path in one of three methods: A CLI script, real-time playback, and a geometry representing the splined flightpath.
The primary output of the module is a CLI script which can be modified as need be to suit particular needs. The resulting script includes comments indicating the total number of frames and a comment for each frame indicating the current frame number. However, scripts so produced include camera information only. Thus to play the script from the CLI interface, the appropriate scene must first be loaded.
Paths generated by the Spline Animator may be played back in real time by using the ``play'' and ``reverse'' buttons on the interface. Playback speed depends on system loads. However, this method allows the user to get a feel of what the final sequence will look like. The Spline Animator module is intended to be used to design animation sequences, not to run them. However, the performance of the Spline Animator is such that it may be desirable to run sequences straight from the module.
Finally, by selecting the ``Show Flightpath'' button the user may view the camera path as a geometry in the current scene. The camera path geometry is created by connecting subsequent frames of the animation with line segments. Framerate determines how smooth the geometry appears, since framerate determines the length, in time, between each frame (and thus the length of each line segment in the geometry).
Figure 2 shows the main menu of the Spline Animator interface. This menu appears when the module is included in the AVS network editor.
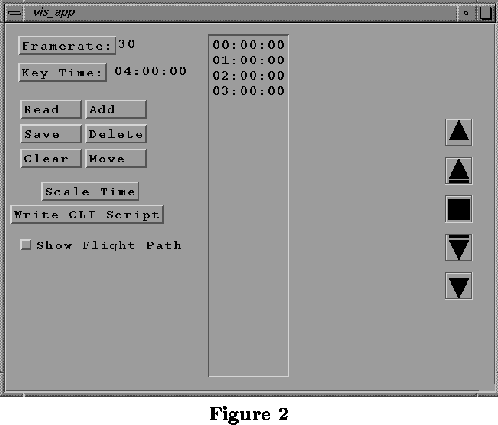
The buttons on the left are used to manipulate the current script. The keytime for each keyframe is displayed in the list in the center. In general, each button has an associated pop-up dialog. Each dialog allows the option of making the specified change, cancelling the operation, or obtaining a brief help file. In all cases, the changes are irreversible, so use care when employing drastic measures.
The Framerate, Key Time, Clear, Add, Delete and Move buttons are all relevant to script creation. Scale Time is also an important script creation feature but is described elsewhere. Each button is explained in detail below:
Framerate
Pressing this button pops up a dialog for changing the framerate of the current animation. The current framerate is always displayed just to the right of the framerate button. Note that framerate must be an integer greater than 0. Note also that changing framerate may change the keytime for some or all of the keyframes in the current animation. For example, if the current framerate is 30 and the keytime for some keyframe is xx:xx:15. Then changing the framerate to 60 would change this keytime to xx:xx:30.
Key Time
Pressing this button pops up a dialog for changing the current keytime. Keytime determines the keytime for the next keyframe added (see below). Note that the mm:ss:ff format must be adhered to when entering a keytime. Also, the frames portion of a keytime must be less than the current framerate.
Clear
This button simply clears the current script. Note that this is an irreversible process so use with caution.
Add
This button allows the addition of new keyframes to the curent script. The current Key Time always indicates the keytime of the next keyframe to be added. Adding a keyframe consists of specifying up to three 3-vectors: position, up and view-plane normal. Position determines where the camera is located; up determines the up direction (i.e. orientation) for the camera; and view-plane normal specifies the direction in which the camera is ``looking''.

Figure 3 shows the layout of the add keyframe popup. Position and up are easily specified as 3-vectors and should be in the format (x,y,z) as indicated in the figure. As mentioned previously, there are three methods of defining a view-plane normal. The DOF, At and Vpn toggles specify Direction-of-Flight, Look-At and standard View-Plane Normal vectors respectively. If a DOF view-plane normal is specified it is not necessary to enter a 3-vector. Clicking the OK button creates the keyframe and inserts it in the appropriate position in the list.
Note that it is possible to overwrite existing keyframes by setting the current keytime to that of an existing keyframe. In this case, user verification is required to add the new keyframe.
Delete
This button deletes one or more keyframes from the current animation. Keyframes are selected for deletion by highliting the relevant keytimes in the list of keytimes and clicking the Delete button.
Move
This buttons moves a keyframe to some new keytime as specified by the user. The keyframe to be moved is selected by highliting the appropriate keytime in the list of keytimes and clicking the Move button. Only one keyframe may be moved at a time. After selecting a keyframe the user is queried for a new keytime and the keyframe is moved to the specified time.
Note that it is possible to overwrite an existing keyframe my moving another keyframe to the same keytime. In this case, user verification is required to move the keyframe to the new keytime.