xcrl is an X-Window System based application which provides a graphical user interface to Cray/REELlibrarian and the UNICOS tape subsystem for CRAY Y-MP systems. The application was developed with the Forms Library toolkit and Cray C++ and runs under UNICOS 8.0.4.1. xcrl allows users to archive data to and retrieve data from tapes, and manage the data using the CRL catalog. Users can archive individual files or tar files. In addition, users may retrieve selected files from archived tar files. Users can also access the catalog entries for volume sets and files to change permissions, group ownership, and passwords. xcrl allows users to mark volumes for physical movement between various sites. Finally, xcrl provides privileged access to volume sets, files, and volumes for CRL administrators.
To use xcrl at your workstation, follow these steps:
1. Open a window on your workstation. Type xhost +denali.arsc.edu.
2. Log on to denali.
3. In the denali window, set your DISPLAY environment variable to the name of your workstation:
For example, if your workstation is onyx2.arsc.edu, you would type
setenv DISPLAY onyx2.arsc.edu:0 (if your shell is csh or tcsh)
export DISPLAY=onyx2.arsc.edu:0 (if your shell is sh or ksh)
Replace onyx2.arsc.edu in the appropriate example above with the name or your workstation.
4. In the denali window, type xcrl. This will run xcrl and it will display on your workstation's terminal.
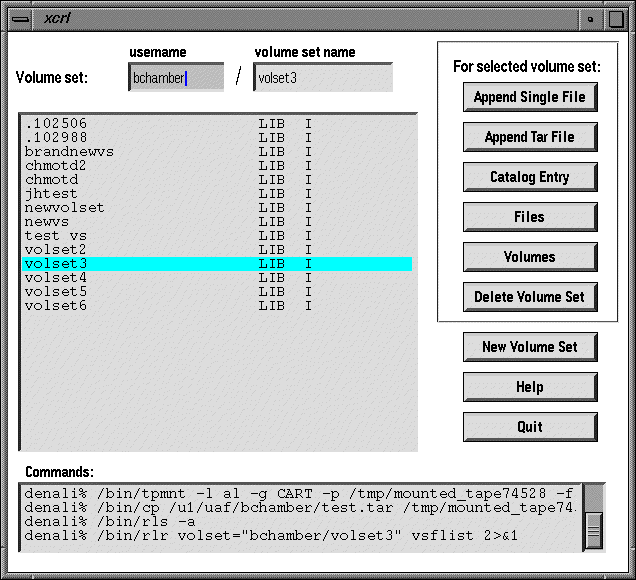
The main window is the first window that displays when xcrl is executed. The main window organizes information about your volume sets. In the center of the window is a listing of volume sets belonging to the user specified in the username field. The names of the volume sets are given in the first column of the listing. By default, your username is shown in the username field, and your volume sets, if you have any, are listed.
A CRL administrator can list another user's volume sets in the main window by entering their username into the username field. If you are not a CRL administrator, entering another username into the username field will cause a warning message to appear stating that you cannot list that user's volume sets.
However, if you are not a CRL administrator, you may still access an individual volume set belonging to another user if you know the name of the volume set. To access such a volume set, enter its name into the "volume set" field. If that volume set does not exist, an error message will appear. If the volume set does exist, it will be added to the volume set listing in the window and you may access it by using any of the buttons on the right, if the appropriate permissions have been set.
Note that most of the buttons on the right will become disabled whenever an invalid username is entered in the username field or an invalid volume set name is entered in the volume set field.
At the bottom of the main window lies the commands browser. This browser contains a listing of all of the commands which xcrl has executed on the host computer. This may be useful in determining what xcrl is doing and in learning some of the commands that is uses.
xcrl allows you to archive a single file or a tar file. To archive a single file, click on the "Append Single File" button. This operation will append a file of your choice to the currently selected volume set. After you click on the button, a file selector will appear with which you may select the file you want to archive. Next, an input box will appear to take the name you want to give the file on the volume set. You may cancel the operation during either of these two steps by entering nothing into the input fields.
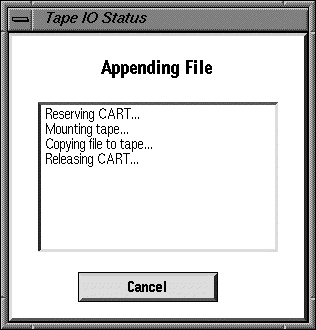
After these steps are completed, the file you selected is appended to the selected volume set, assuming that you have permission to do so (if the volume set belongs to another user). A tape IO status window is displayed while this operation is in progress. See the "Tape IO Status Window" section for more information.
Appending tar files has many advantages over appending individual files. For example, you may archive many files and/or directories at one time rather than archiving a single file at a time. Also, tar files maintain useful information about their contents, such as the modification dates of the individual files, that can be helpful in determining what files to retrieve.
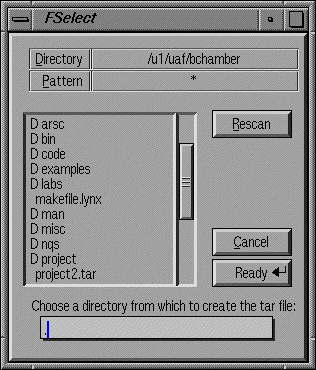
To append a tar file to the selected volume set, click on the "Append Tar File" button. After doing so, you will be asked to choose a directory from which to create the tar file. See the "Selecting Directories with the File Selector" section for information on how to do this.
After a directory has been selected, a tar file archive window is opened, from which you may select the files and/or directories you want to put in the tar file. See the "Tar File Archive" section for more information.
The files contained in the selected volume set may be accessed by clicking on the "Files" button. Doing so will display the files window for that particular volume set. See the "Files Window" section for more information.
The volumes of a selected volume set may be accessed by clicking on the "Volumes" button on the main window. Doing so will display the volumes window for that particular volume set. See the "Volumes Window" section for more information.
The CRL catalog entry for the selected volume set may be accessed by clicking on the "Catalog Entry" button. Doing so will create a window containing the complete catalog entry of the volume set and several input fields which may be used to modify the catalog entry. See the "Catalog Entry Windows" section for more information.
You can delete the selected volume set by clicking on the "Delete Volume Set" button. When this button is clicked, a question box in popped up to confirm the request. If you click "Yes" on the dialog, the volume set is deleted and its entry is removed from the list. Clicking "No" on the dialog leaves the volume set untouched. Be careful when deleting a volume set - all data on the volume set is permanently lost when a volume set is deleted.
You can create a new volume set by clicking on the "New Volume Set" button on the main window. After doing so, you are prompted for the name of the new volume set. Once a name has been entered, the volume set is created and added to the volume set list. A new volume set contains a single volume and no files, and its catalog entry is given the default values.
Clicking on the "Help" button displays the help window. See the "Help Window" section for more information.
To quit xcrl, click on the "Quit" button. If a tape IO operation is in progress, you will be asked to confirm the action, which will cancel the operation.
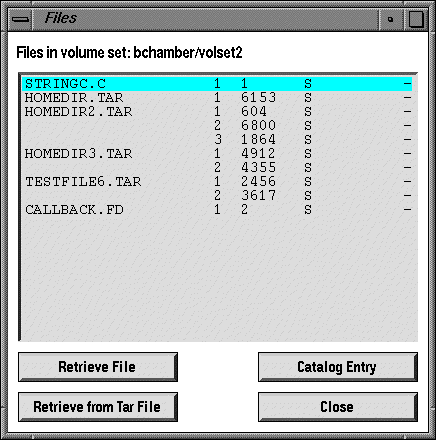
The files window provides access to the files located on a particular volume set. You can open this window by clicking on the "Files" button on the main window when a volume set is selected.
You can retrieve the selected file by clicking on the "Retrieve File" button. Upon doing so, you will be prompted to select a destination filename with the file selector. If an existing file is selected, you will be asked to confirm the retrieval, which will overwrite the existing file.
Once a destination for the retrieval is chosen, the file retrieval process begins. A tape IO status window is displayed during this process. See the "Tape IO Status Window" section for more information.
Finally, when the process is complete, a message dialog pops up confirming the retrieval.
xcrl also allows you to retrieve selected files from within an archived tar file. In order to do this, xcrl must first build a list of the contents of the archived tar file. This is done by mounting the file and reading it. A tape IO status window is displayed while this operation is in progress. See the "Tape IO Status Window" section for more information on this window.
When the list is compiled, a Tar File Retrieval window is opened containing the list. See the "Tar File Retrieval Window" section for more information.
To access the CRL catalog entry for the selected file, click on the "Catalog Entry" button. This will open a catalog entry window from which you can view and modify the catalog entry. See the "Catalog Entry Windows" section for more information about this window.
To close the files window, click on the "Close" button.
The volumes window provides access to the volumes located on a particular volume set. You can open this window by clicking on the "Volumes" button on the main window when a volume set is selected.
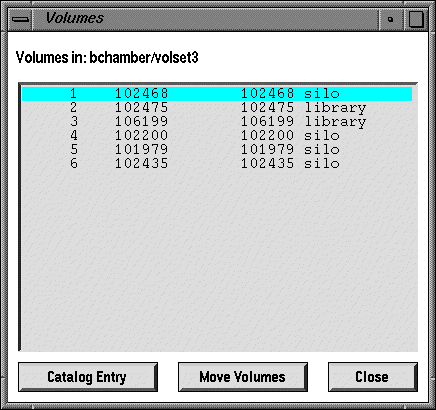
To access the CRL catalog entry for the selected volume, click on the "Catalog Entry" button. This will open a catalog entry window from which you can view catalog entry. See the "Catalog Entries Windows" section for more information about this window.
Clicking on the "Move Volumes" button pops up the move volumes window, which you can use to mark individual volumes or the entire volume set for movement to and from the silo. See the "Move Volumes Window" section for more information.
To close the volumes window, click on the "Close" button.
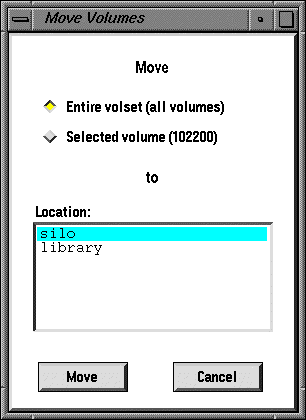
xcrl provides you with the capability to move your volumes to and from the robotic silo. Tapes located in the silo are automatically accessed by a robot and placed into a drive from where they may be read or written. Tapes located in the library must be physically put into the silo to be accessed, which could take some time. While there is generally no need for a user to move volumes outside of the silo, there may be instances when some of your volumes have been moved out of the silo (to make more room for other volumes) and you would like to move them back to the silo.
The move volumes window, can be used mark individual volumes or entire volume sets for movement to and from the silo. In this window, you can choose whether to move the single, selected volume, or to move all of the volumes in the volume set, and the location that you would like to move the volume(s) to.
To move either the entire volume set or the selected to the silo or the library, click on the "Move" button.
Note: the operation executed by xcrl to move volumes doesn't actually move volumes from place to place. It only marks the volume(s) to be moved. Physical movement of the volume(s) requires human intervention. As such, requests to move a volume or volumes into the silo take around 15 minutes on average (assuming an operator is on duty) and requests to move a volume or volumes out of the silo are usually handled the next day.
To close the move volumes window without moving any volumes, click on the "Cancel" button.
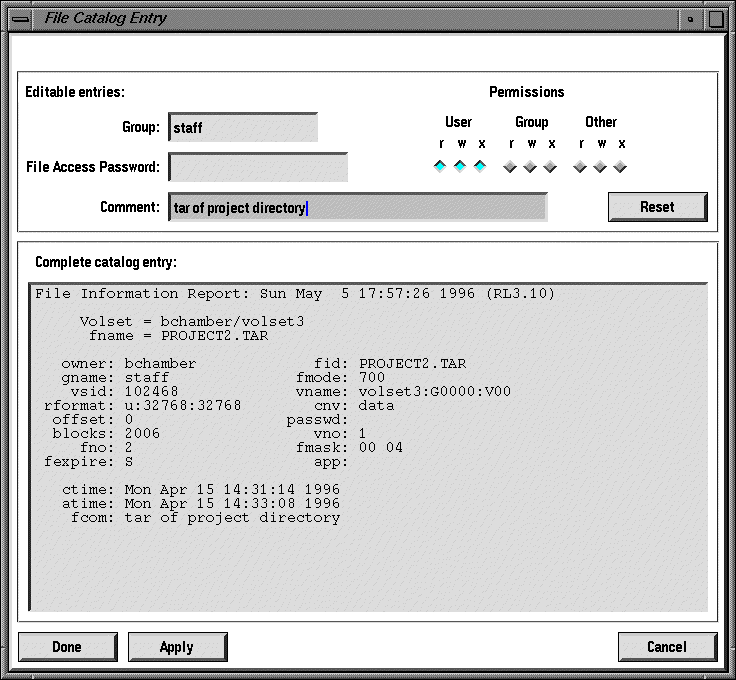
xcrl allows you to view and modify the CRL catalog entries for volume sets and files, and view the catalog entries for volumes. Each of the windows to accomplish these functions are very similar.
The file catalog entry window contains two sections: an input section and a display section. The input section contains several input fields which are used to modify certain fields in the catalog entry, and the display section displays the full catalog entry. The volume set catalog entry window is identical to the file catalog entry window, with the exception that it does not include the group and password input fields in the input area.
Clicking the "Apply" button updates the catalog entry with the current values in the input area, and updates the catalog entry display area.
Clicking on the "Done" button updates the catalog entry with the current values in the input area and closes the catalog entry window.
Clicking on the "Reset" button sets the values in the input area to the appropriate values in the catalog entry. For example, if you make a change to one of the input fields without clicking the "Apply" button, the "Reset" button will change the input field to its previous value.
Clicking on the "Cancel" button closes the catalog entry window without updating the catalog entry.
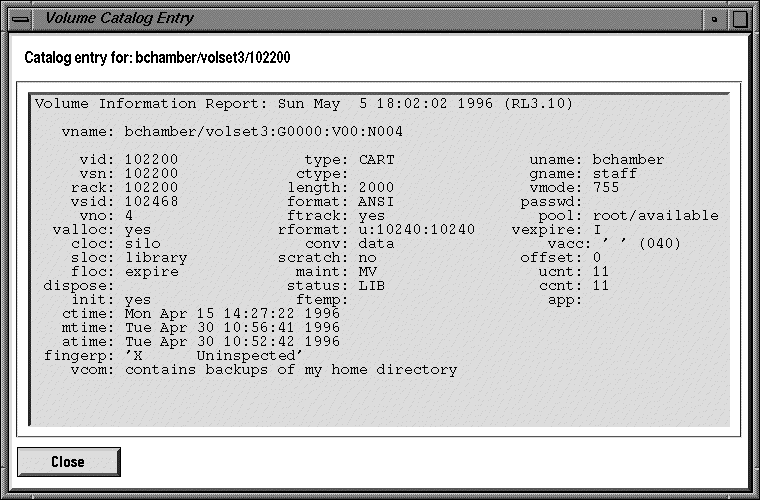
The volume catalog entry window, contains only the display area, with no input area for modifying the catalog entry.
Several operations supported by xcrl involve reading from or writing to tapes. These are as follows:
* appending a file to a volume set
* appending a tar file to a volume set
* retrieving a file from a volume set
* retrieving selected files and directories from an archived tar file
* reading the contents of an archived tar file
xcrl executes each of these operations in a very similar manner. When one of these operations begins, xcrl displays the tape IO status window, which describes the current status of the operation. Each tape IO operation executes the following four steps:
1. reserve a tape
2. mount the appropriate tape
3. read from or write to the tape
4. release the tape
The status window lists these steps as they occur.
If an error occurs during the IO operation, an error message pops up with the appropriate error message. If the meaning of the error message is not self-evident, you may want to investigate the last entries of the tape.msg in the directory from which you executed xcrl. This file contains information from the UNICOS tape IO subsystem that is logged whenever tape activity occurs.
If no error occurs during the tape IO operation, then a message pops up confirming the operation once it is complete.
The tape IO status window contains a "Cancel" button, which can be used to cancel the operation at any time. When this button is clicked, a confirmation message pops up asking you to confirm the cancellation of the operation. Be careful when canceling a tape IO operation when the tape is being either read or written, as the data being written may be corrupted by exiting the operation prematurely.
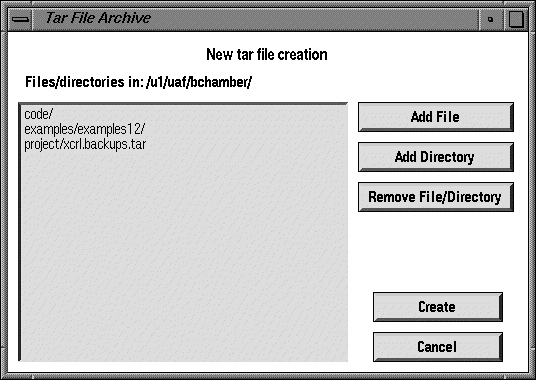
The tar file archive window is used to create tar files to append to a volume set. This window is opened when the "Append Tar File" button on the main window is clicked. It contains a listing of the files and directories that you want to include in the tar file. Note that all file and directories that you add to the listing must reside in the directory you chose to create the tar file from.
Clicking on the "Add File" button will pop up the file selector, from which you can select a file to add to the tar file.
Clicking on the "Add Directory" button will pop up the file selector, from which you can select a directory to add to the tar file. See the "Selecting Directories with the File Selector" section for more information on how to do this.
If you change your mind about adding a file or directory to the tar file, you can remove the currently selected entry in the list by clicking on the "Remove File/Directory" button.
Clicking on the create button begins the process of creating the tar file and writing appending it to the volume set. A tape IO status window displays while this operation is in progress. See the "Tape IO Status Window" for more information.
You may cancel the tar file archive at any time by clicking on the "Cancel" button.
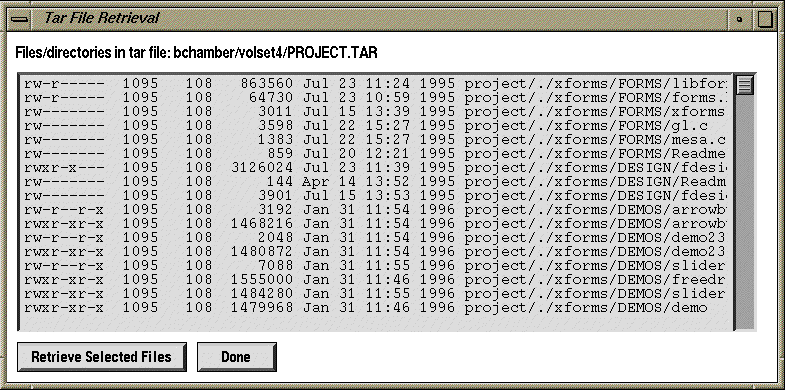
The tar file retrieval window allows you to retrieve only certain files from a tar file. This window is created after clicking on the "Retrieve from Tar File" button on the files window. The window contains a listing of the files in the archived tar file.
To retrieve any number of files from the archived tar file, select the files you wish to retrieve and click on the "Retrieve Selected Files" button. This will start a tape IO operation to retrieve the files and the tape IO operation status window will be displayed. See the "Tape IO Status Window" section for more information.
When you are done, click on the "Done" button to close the window.
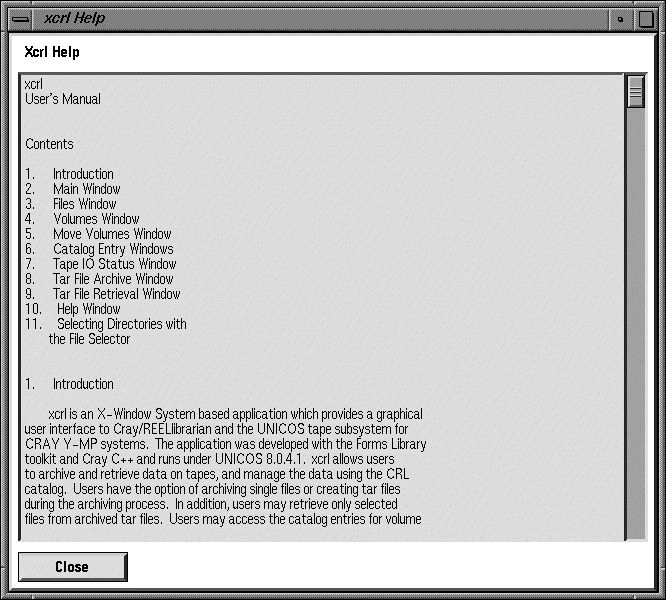
The help window contains a browser with which you may scroll through the help file. The help file displayed is a slight modification of this document.
To close the help window, click on the "Close" button.
In some cases it is necessary to select a directory with the file selector. When either creating tar files or retrieving from tar files you are asked to choose the directory in which to create or extract the tar file, and it may not be obvious how to do so.
The only method possible to select a directory with the file selector is to enter to directory you want to select, and enter a period (".") in the filename entry field, before clicking on the "Ready" button. In all cases where you are required to select a directory, the "." is placed in the filename field by default.